
How to manage multiple coding agents on your Mac
With one coding agent, you simply follow its terminal. With several, the work is keeping track: which agent has which task, which one is waiting for a permission and where to answer it, and where the next task goes when every desk is busy. This is how we run Claude Code, Codex and Claude Cowork sessions side by side, with early Gemini support, in OffiAI, a free app for Macs with Apple silicon that we make. Each session works at its own desk in one office window.
If you only want your Claude Code sessions side by side, read How to see all Claude Code sessions at once on your Mac first. This post covers the rest of the workflow: starting work, answering approvals, lining up tasks and reviewing the results.
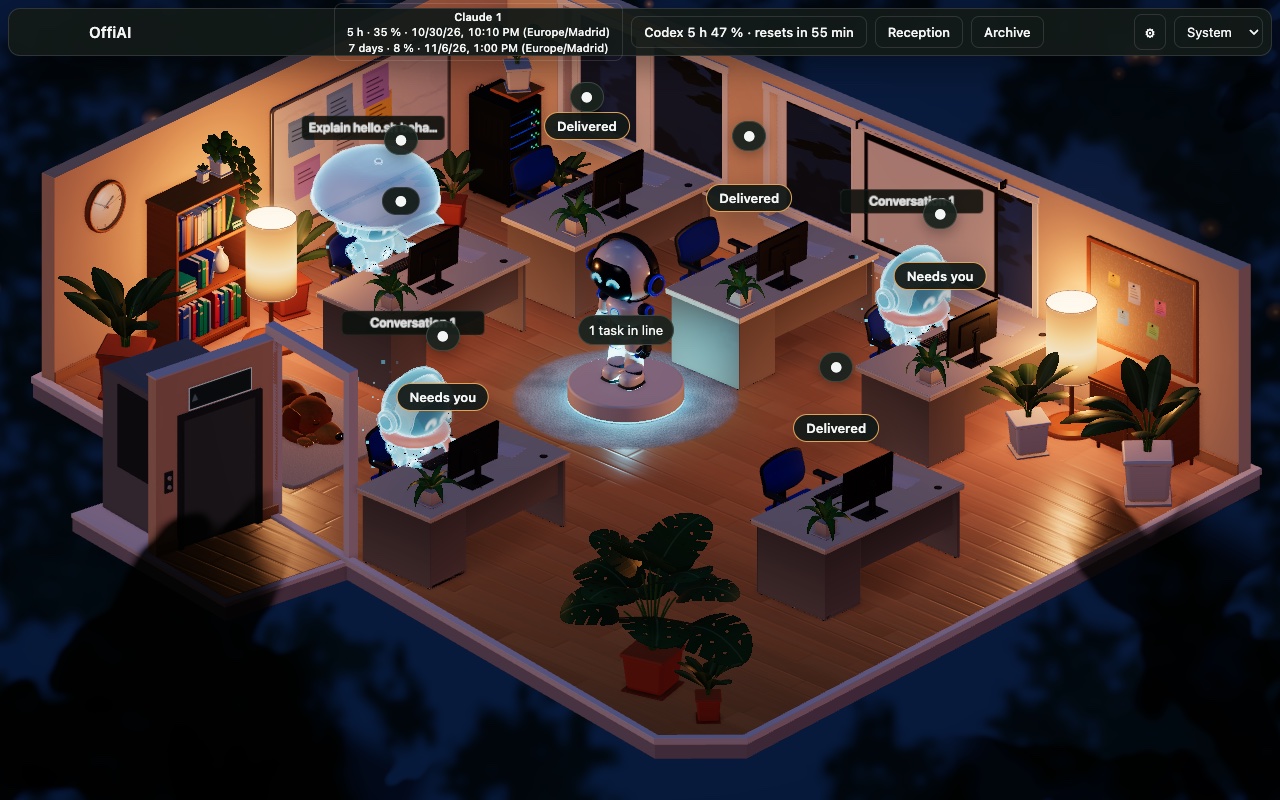
A few terms: a desk is one agent session with its own conversation; click it to open its panel, whose Talk drawer holds the conversation. Reception is where you start new work from the app. Needs you means a session is waiting for your answer. Delivered means an agent finished its turn; whether the work is accepted stays your decision. Desks that are working or waiting also show a hologram, a see-through figure at the desk.
Which agents can share the office
- Claude Code. Nothing to install. OffiAI reads the session files Claude Code keeps on your Mac, so sessions you start in a terminal and sessions you start from OffiAI both get a desk.
- Codex CLI. Run the small installer from the Codex setup guide and approve its hooks once. Each Codex CLI session then appears at a desk with your first prompt.
- Claude Cowork. Install the OffiAI plugin in the Claude desktop app (Cowork setup guide). In this preview a conversation appears at its own desk when you ask Claude to report it to OffiAI.
- Gemini (Antigravity CLI). Support is early and there is no setup guide yet. OffiAI shows Gemini sessions when it finds the Antigravity CLI’s data as it starts, and you can switch Gemini off in Settings.
Every agent keeps its own login and subscription. To tell desks apart, open a desk’s panel: the Talk heading carries a badge with the agent’s name, such as “Claude Code” or “Codex”. Each agent has its own hologram look. Reception counts the team at the top, for example “5 Claude · 1 Codex”.
Start work from Reception
Click the round pad in the middle of the office to open Reception. Choose a working folder, write the task and pick the agent. The agent list shows each agent with the version OffiAI found, or the reason it cannot start right now; in our demo profile it read “Gemini — Gemini is off in Settings. Turn it on, then reopen OffiAI.” Press “Start at a desk” and the agent starts in that folder at a free desk, and the desk’s Talk drawer opens.
- Claude Code desks take follow-up messages from the drawer. “New conversation” starts a fresh session there, and Stop interrupts only that desk’s running turn.
- Codex and Gemini, when started from Reception, run in their own terminal session. Their answers appear in the Talk drawer, and you reply from there one line at a time.
Sessions you start yourself in a terminal still get a desk. You can message a terminal-started Claude Code session from its desk while it is not busy in the terminal. Codex and Gemini sessions started in your own terminal are shown read-only; the drawer says, for example, “Observed only — continue this session in Codex.”
If the folder is a Git repository, Reception can put a Claude Code task on its own branch, so two tasks in one repository do not edit the same working folder.
Know where each approval is answered
Every agent asks before some actions, and each asks in its own place. Only Claude Code requests can be answered inside OffiAI. For the other agents, OffiAI shows that a desk is waiting and where to answer:
- Claude Code tasks you start from OffiAI. Permission requests come to OffiAI. The desk says “Needs you”, and “Review and approve” in its Talk drawer opens Approvals with the tool, the file or command, the folder and Allow / Deny. In our demo one request read “Edit · test_one.py”, folder demo-tests.
- Claude Code sessions you start in a terminal. By default they keep asking in the terminal. Approvals you can answer from one place explains the optional setting that brings their Bash requests to the desk.
- Codex and Gemini. Approvals stay in the agent’s own terminal. A desk started from Reception says “Approve in Terminal” and offers “Open in Terminal”.
- Claude Cowork. Use “Open in Claude” on the desk to go to that conversation in the Claude app.
If you are not looking at the office, alerts can tell you when a desk finishes, waits or gets stuck. They are off by default, apart from the in-app “Delivered” chip; Alerts when any agent finishes, gets stuck or needs you lists them.
When every desk is busy: the line
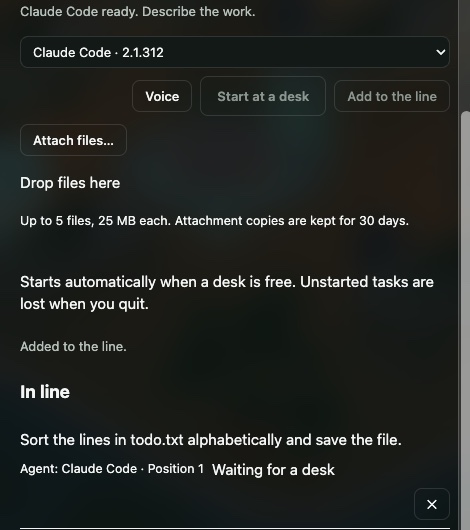
When every desk is held, new work takes over the desk that has been idle longest. Desks that are working, need you, or hold a result you have not marked done yet (Delivered, or Reviewed: you looked at it but did not mark it done) are not taken over. When no desk can be taken over, write the task in Reception as usual and press “Add to the line” instead of “Start at a desk”. How many desks an office has is explained in the Claude Code sessions post.
The task waits in Reception’s “In line” list with its agent, its position and “Waiting for a desk”, and the reception pad shows how many tasks are waiting (“1 task in line” in the picture above). You can move a task up or down or remove it before it starts, and the line holds up to 20 tasks. The line is not saved: quitting OffiAI discards tasks that have not started.
A waiting task starts as soon as a desk can be taken over, for example when you release one. Delivering, reviewing, answering an approval or pressing Stop does not free a desk for the line. In our demo every desk was held, so we marked one Claude Code job done and pressed “Release idle desk” in its drawer; the waiting task started at that desk by itself.
Review what each agent delivered
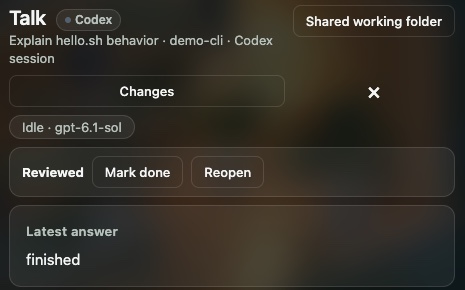
When a turn finishes, the desk says “Delivered”. That means the agent is done, not that the work is accepted. In the Talk drawer you choose “Mark reviewed”, then “Mark done”, or “Reopen”. In our demo the Claude Code and Codex desks showed the same row; the Codex one is pictured below. A job you have not marked done keeps its desk, so unreviewed work does not get pushed out.
To see what changed, open Changes in the drawer. For Claude Code, OffiAI keeps the files the session edited. For Codex and Gemini it can check the folder for current changes, but it cannot tell which agent made them. See what each agent changed, and open it in your editor covers this in detail.
Find work again in the Archive
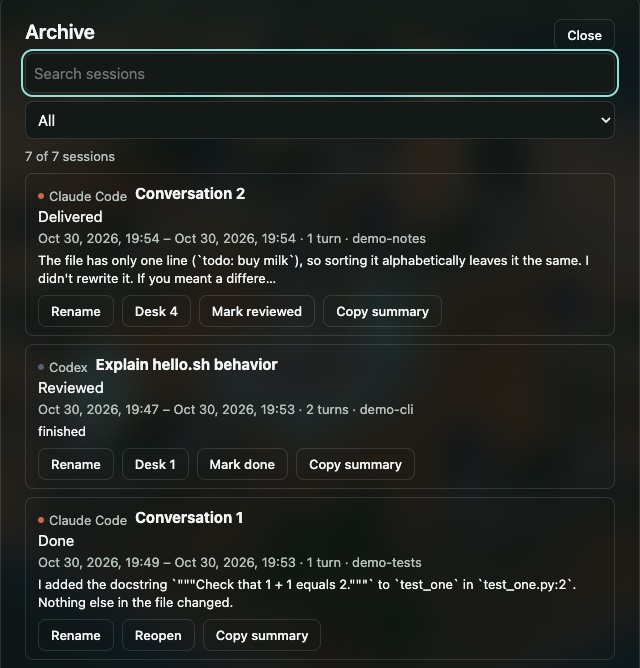
Click “Archive” in the top bar. It lists the sessions OffiAI has seen from every agent, newest first, with their agent and state. You can filter by state (Working, Delivered, Reviewed, Done) and search as you type. A session that still holds a desk shows that desk (“Desk 4”), and a Claude Code session that no longer has a desk can be reopened onto a free one. How search works is in the Claude Code sessions post.
What you need, and the limits
- A Mac with Apple silicon. OffiAI is a free public preview and changes often; every build is in the changelog.
- Claude Code installed and signed in: 2.1.272 or newer, below 2.2, to see sessions, and 2.1.302 or newer to start or continue work from OffiAI. Claude Code 2.2 is not supported yet.
- Codex CLI 0.161 up to 0.169. Other versions are not shown.
- Messages to Codex and Gemini from a desk are one line, and a message that starts with “/” or “!” is refused, because the agent would run it as a command.
- Approvals inside OffiAI are for Claude Code only. Codex and Gemini approvals stay in their terminal.
- Gemini support is early and has no setup guide yet.
- OffiAI does not coordinate agents that edit the same folder. Give parallel tasks separate folders, or use a branch per task where Reception offers it.
- Tasks waiting in the line are lost when you quit OffiAI.
- Alerts are off by default, apart from the in-app “Delivered” chip.
OffiAI reads these sessions on your Mac and has no server that would receive them. Our data statement is at offiai.app/app-data.
Try it
Download OffiAI from the release page, connect the agents you use, and start your next task from Reception.
In pictures
Want to try it? Join the preview.